
Emailing Power BI Query output as a CSV Files using Power Automate
I recently had a requirement from a customer where they wanted a list of all Customers and the Primary Contact to be emailed to them every day.
The reason for this to be emailed daily is to ensure that when calling the customer, they know whom to speak to.
This got me thinking and I could use Power Automate to achieve this task which I detail in this blog post below.
Getting the DAX Query without having to write it by hand
As I have previously explained in the past it is far easier to let Power BI Desktop write the DAX query instead of me having to type it by hand.
I connected to my dataset in the Power BI Service, and then created the table below.
Create table

I then and opened Performance Analyzer which would allow me to get the DAX Query for the above table.

I then clicked on Start recording and Refresh visuals, after it completed, I could then see the option to copy the DAX query.

I clicked on Copy query, which allowed me to then get the DAX query as shown below.
// DAX Query
DEFINE
  VAR __DS0Core =
    SUMMARIZE('Customer', 'Customer'[Customer], 'Customer'[Primary Contact])
  VAR __DS0PrimaryWindowed =
    TOPN(501, __DS0Core, 'Customer'[Customer], 1, 'Customer'[Primary Contact], 1)
EVALUATE
  __DS0PrimaryWindowed
ORDER BY
  'Customer'[Customer], 'Customer'[Primary Contact]
I then copied and saved this query in notepad
Creating the Power Automate flow to send the table details via email
The final part for me was to now create a Power Automate flow in which I will create the schedule, put in the DAX query, create the CSV file and then send it out via email.
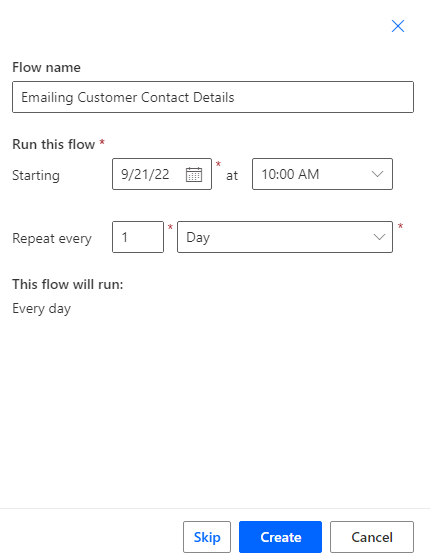
I created a new Scheduled cloud flow

I then gave it meaningful name and put in how often I wanted this flow to run and clicked on Create
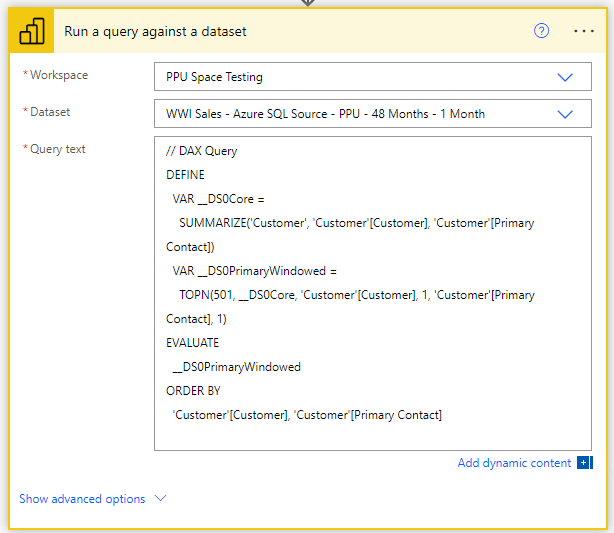
Next step I needed to create a new step to run the DAX query, I selected the Run a query against a dataset

Then I selected my workspace, dataset and put in the DAX query I previously had created from Power BI Desktop.
Next, I created the step to create the CSV file as shown below.

In this step I then selected the First table rows from the dynamic content. This is the actual query results.

The final step was for me to email out the CSV file to the recipients. I did this by selecting the Send an email (V2)

I then put in the recipients I want to send it to, the subject, the body.
And then I had to put in the Attachments Name – 1 and the Attachments Content – 1 which is highlighted below.
NOTE: You will see in the Attachments Name – 1 I had to put in the extension of CSV, this will ensure that the file will come through with the valid extension.

I then clicked Save.
I then renamed my steps to something more meaningful.

As shown below I then got the email with the attachment.

Summary
In this blog post I have shown you how I created a Power Automate flow and send it out via email to users.
I Hope that you found this useful. I certainly did as it allows me to extract data quickly and easily from my Power BI dataset and use it in a meaningful way.
For me it also means using the Power BI Dataset as a single source of truth for not only reports but also for data extraction.
Have an awesome week!
Awesome! It is really helpful.
I do the same buy my csv file dont see as well. Only see one row with many unread character any idea?
Hi Axelito,
I would suggest checking the previous step before the export to make sure that it has got the data you expected.
Thanks for sharing Gilbert, and well done on this
Thanks Keith!!
i do the ssme thing but i can read my csv file, only see one row with manymany characters unreable.
u can help my , any idea
Hi Axelito,
I would recommend you try and get the DAX query in Power BI desktop and then try and use that?
[…] Gilbert Quevauvilliers finds a way: […]
Hi Gilbert, I discovered your blogpost thanks to Curbal.
Do you know how to take the DAX query with current filters applied on a visual? How to make this CSV extraction dynamic?
Many thanks,
Céline
Hi Céline,
To make it dynamic you would need to pass through the filter via another variable in Power Automate as far as I am aware.
Do you have a working example?
Thanks
Gilbert
Hi Gilbert,
This is very useful, thanks for sharing. I’d like to take this one stage further but I’m stuck.
Do you know if it would be possible to have a dynamic distribution list based on an employee email address field within the Power BI data set we’ve just run a query against?
Thanks in advance
Hi Ben
What I would think you could do, is to get another PBI Dataset query to get the list of email addresses.
Then store these emails in an array in Power Automate.
Finally, then in the emailing part of the Power Automate you could then use the email array to send it out to those users?
This is really useful thanks Gilbert. I can see plenty of uses for this.
Thanks for the kind comments, Clem 🙂
Hi Gilbert
Thanks for the informative sharing~
After I utilized this method to send out email with a .csv attachment, how can I deploy RLS on the dataset to the scheduled flow and send out the email with filtered contents to different users based on their permissions?
I’m looking forward to your comments, thanks in advance!
Hi Ivy,
You could look at potentially doing this with filters.
Hi Gilbert
This works perfectly for me but with one issue.
The names of the columns in the CSV add in as a prefix the name of the data set plus also add the column name in square brackets. In my example it is PurchaseOrder[ContactName]. Looking at your workings above I would expect you would have column names such as Customer[Customer] and Customer[Primary Contact] in your CSV. Have I missed something or do you have the same result in your CSV export?
Hi Craig,
Yeah, that is exactly what happens. What I then do is to map the CSV to new columns, where it uses the friendly column names.
Here is an example of how to do the mapping. Power Automate Mapping with Select