
Steps on how I backed up my Power BI Premium Per User / Premium Database
Continuing with my series of using Power BI Premium Per User (PPU), today I am going to show you how to back up your PPU database.
As far as I am aware all the options below will work for Power BI Premium as well.
To me this is critical when my dataset size grows. Especially when it takes multiple days to process all the data into the required partitions.
Not only is having a backup best practice, if something must go wrong with a deployment (let’s say I wipe out the partitions by mistake) it will be quick and easy to restore from a backup.
Configuring the Azure Data Lake Storage
The first requirement for backing up PPU, is that the Azure Data Lake Storage (ADLS) account must be Gen 2 and have Hierarchical Name Spaces enabled.
You can find details here on how to complete this: Configuring dataflow storage to use Azure Data Lake Gen 2 – Power BI | Microsoft Docs
As shown below this is what my ADLS Gen 2 looks like with the Hierarchical Name Spaces enabled.

I then had to ensure that I configured the Power BI Access control (IAM) with the role of “Storage Blob Data Owner” as shown below.

Now I had everything configured from the ADLS for backing up of PPU.
Power BI Configuration
Next, I had to complete the Power BI configuration with the steps below.
I went into the Admin Portal and clicked on “Azure Connections”
I then connected to my ADLS I had created in the steps earlier “mvpnpbibackups”. As you can see below it successfully connected.

Next, I went to my PPU App Workspace. I clicked on Settings and then on Azure connections.
I then put a tick in the box for “Use the default Azure Connection”
NOTE: I found that if I tried to use it by clicking on “Connect to Azure” it did not work for me.

I then clicked Save, and then I could then see that I had connected to the storage.
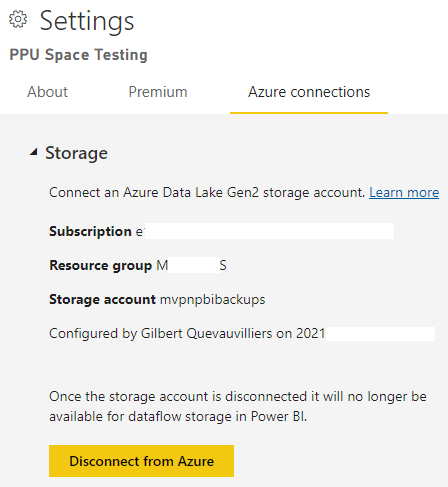
Now I have completed linking my Power BI PPU App Workspace to the ADLS.
Finally, backing up the PPU Dataset
Now I got to the final step where I can now go and back up my PPU Dataset.
I am going to show you how I did this in SQL Server Management Studio (SSMS)
I clicked to connect on Analysis Services

I then put in my PPU App Workspace Connection details, and then connected.

I then right clicked on the database that I wanted to backup and then selected backup.

This brought up the Backup Window, I put in my settings and then clicked on Script as shown below.

I always like to script out to see progress and if any errors, which is shown below.

Once completed I could see it was successful

I then went to verify my backup in the Azure Storage Explorer and I could see it below

Summary
In this blog post I have shown you the steps on how to configure the ADLS Gen 2, then how to configure Power BI to connect to the ADLS Gen2, and then finally backup the PPU database.
I hope that you have found this useful and will help you back up your PPU databases.
Thanks for reading and have a wonderful week!
[…] Gilbert Quevauvilliers wants you to back that thing up: […]
We have problems with the configuration as long as the firewall for the storage account remains switched on. We had to make the executing user the owner of the storage account and assign him the storage blob owner role. Why you use the Applications, does it work without deactivate the firewall?
Hi there, as far as I am aware the firewall has to be turned off for this to occur.
[…] Can use this as reference: Steps on how I backed up my Power BI Premium Per User / Premium Database – FourMoo | Power BI … […]