
Power BI – How to Easily Create Dynamic Date Table/Dimension with Fiscal Attributes using Power Query
I have been working on some new projects and one of the things that I found that was whilst you can find examples of creating Date tables, I could not find any examples of where the Date table included Fiscal Attributes such as Fiscal Month, Fiscal Quarter and Fiscal Year.
So in this blog post I am going to show how you can easily create your own date table with Fiscal Attributes in a few simple steps.
I have also created it in such a way that you can dynamically define your starting year, as well as your starting month for your fiscal attributes.
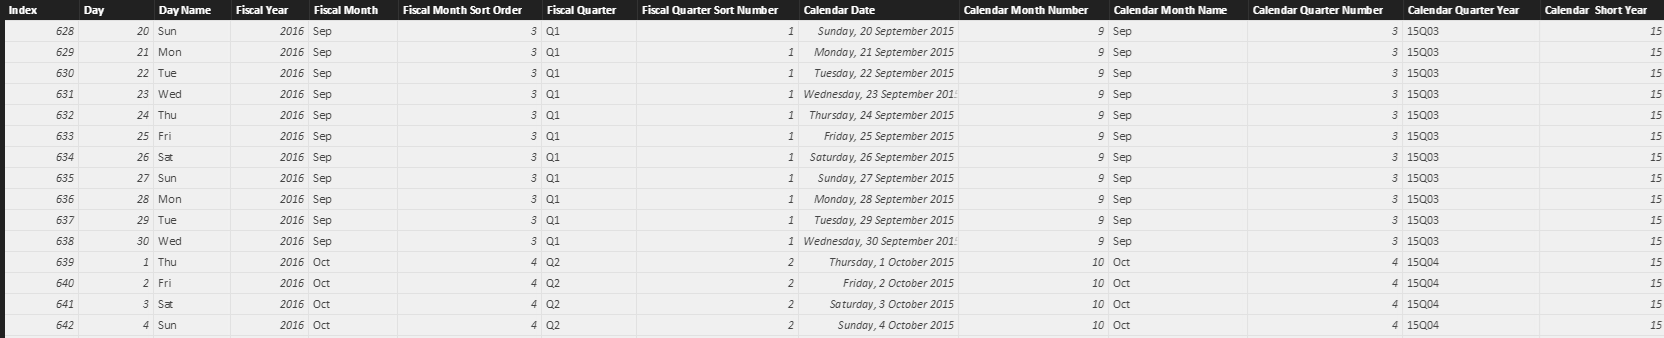
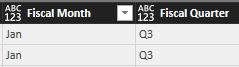
Below is a sample output of what I will explain below.
Creating Parameters
The first step is to create two parameters. These two parameters will be used to dynamically load our Start Year, as well as the Fiscal Start Month
Please NOTE you must create them with the same name and attributes. This is to ensure that the Power Query script will work correctly in the later steps.
This is how I created the Parameters.
-
You can go into Edit Queries, then click on Manage Parameters and I put in the following for Start Year
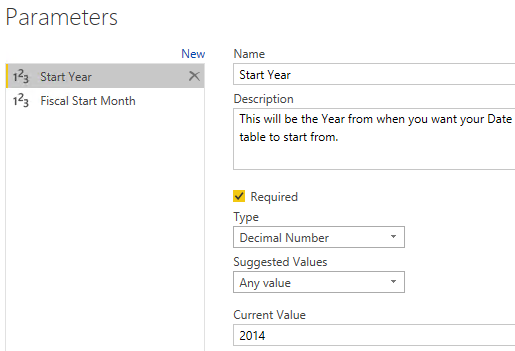
- As you can see above I put in the Name “Start Year”
- I then changed the Type to Decimal Number
- And then put in my Current Value of 2014 for the year I want it to start from.
-
Next is the Parameters for Fiscal Start Month
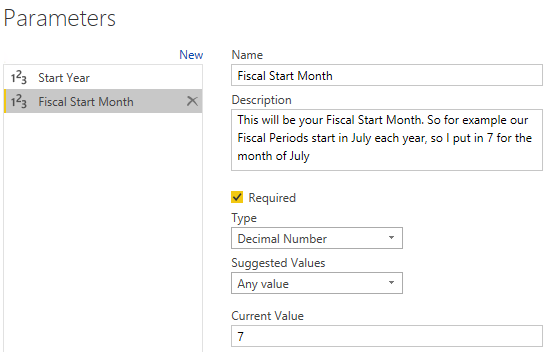
- As you can see above I put in the Name “Fiscal Start Month”
- I then changed the Type to Decimal Number
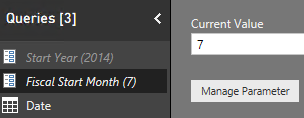
- And then put in my Current Value of 7
-
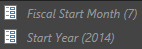
Once completed I had the following under Queries
Creating Date Table with Fiscal Attributes
In this next step is where I used the Power Query language “M” to create my Date Table with the Fiscal Attributes.
You are welcome to read through what I have done, but all that you will need to do is the steps below and copy and paste to get it working. Nothing else needs to be modified in the code below, due to the fact that I worked it all out dynamically using the parameters we created above.
For those people who are interested after the code I will highlight what I did to create the Fiscal Attributes.
UPDATE: 10 Feb 2017
I have put some additional conditions in the code depending on when you want your End Date to be.
- If you want the End Date to be your current Date then you can leave the code as it is.
- If you want the End Date to be 4 years into the future and the last day of that year, then uncomment the second line. (Remember to comment out the previous line)
- And finally if you want the End Date to be the End Date Parameter then uncomment the third line. (Remember to comment out the previous line)
Now in the Query Editor complete the following to create the Date Table
-
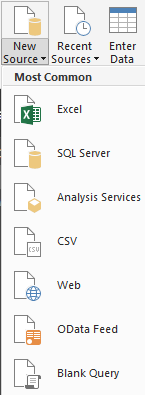
Click on New Source, then Blank Query
-
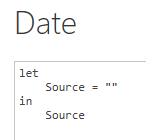
Next I gave the Query a name from Query1 to Date
-
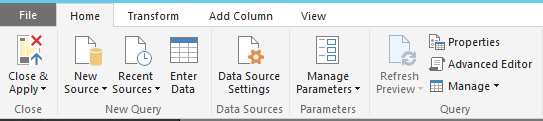
 Then in the Home Ribbon, click on Advanced Editor under the Query section
 -
This will then open the Advanced Editor as shown below.
-
Now copy and paste in the code below.
let Date = let Source = List.Dates, FiscalMonthCalc = 12-#"Fiscal Start Month", // 1. Uncomment this line if you want to get your end date being Today's Date of the Refresh #"Invoked FunctionSource" = Source(#date(#"Start Year", 1, 1), Duration.Days(DateTime.Date(DateTime.FixedLocalNow()) - #date(#"Start Year",1,1)), #duration(1, 0, 0, 0)), // 2. Uncomment this line below if you want your end date to be 4 years into the future //#"Invoked FunctionSource" = Source(#date(#"Start Year", 1, 1), Duration.Days(DateTime.Date(Date.AddDays(Date.EndOfYear(Date.AddYears(DateTime.FixedLocalNow(),+0)),1)) - #date(#"Start Year",1,1)), #duration(1, 0, 0, 0)), // 3. Uncomment this line if you want to get your end date being the Parameter called "End Year" //#"Invoked FunctionSource" = Source(#date(#"Start Year", 1, 1), Duration.Days(#date(#"End Year", 12, 30) - #date(#"Start Year",1,1)), #duration(1, 0, 0, 0)), #"Table from List" = Table.FromList(#"Invoked FunctionSource", Splitter.SplitByNothing(), null, null, ExtraValues.Error), #"Added Index" = Table.AddIndexColumn(#"Table from List", "Index", 1, 1), #"Renamed Columns" = Table.RenameColumns(#"Added Index",{{"Column1", "Date"}}), #"Added Custom" = Table.AddColumn(#"Renamed Columns", "Year", each Date.Year([Date])), #"Added Custom1" = Table.AddColumn(#"Added Custom", "Month Number", each Date.Month([Date])), #"Added Custom2" = Table.AddColumn(#"Added Custom1", "Day", each Date.Day([Date])), #"Added Custom3" = Table.AddColumn(#"Added Custom2", "Day Name", each Date.ToText([Date],"ddd")), #"Added Custom4" = Table.AddColumn(#"Added Custom3", "Month Name", each Date.ToText([Date],"MMM")), #"Reordered Columns" = Table.ReorderColumns(#"Added Custom4",{"Date", "Index", "Year", "Month Number", "Month Name", "Day", "Day Name"}), #"Added Custom5" = Table.AddColumn(#"Reordered Columns", "Quarter Number", each Date.QuarterOfYear([Date])), #"Duplicated Column" = Table.DuplicateColumn(#"Added Custom5", "Year", "Copy of Year"), #"Renamed Columns1" = Table.RenameColumns(#"Duplicated Column",{{"Copy of Year", "Short Year"}}), #"Changed Type" = Table.TransformColumnTypes(#"Renamed Columns1",{{"Short Year", type text}}), #"Split Column by Position" = Table.SplitColumn(#"Changed Type","Short Year",Splitter.SplitTextByRepeatedLengths(2),{"Short Year.1", "Short Year.2"}), #"Changed Type1" = Table.TransformColumnTypes(#"Split Column by Position",{{"Short Year.1", Int64.Type}, {"Short Year.2", Int64.Type}}), #"Removed Columns" = Table.RemoveColumns(#"Changed Type1",{"Short Year.1"}), #"Renamed Columns2" = Table.RenameColumns(#"Removed Columns",{{"Short Year.2", "Short Year"}}), #"Added Custom6" = Table.AddColumn(#"Renamed Columns2", "Quarter Year", each Number.ToText([Short Year]) & "Q" & Number.ToText([Quarter Number],"00")), #"Reordered Columns1" = Table.ReorderColumns(#"Added Custom6",{"Index", "Date", "Day", "Day Name", "Month Number", "Month Name", "Quarter Number", "Quarter Year", "Short Year", "Year"}), #"Changed Type2" = Table.TransformColumnTypes(#"Reordered Columns1",{{"Date", type date}, {"Day", Int64.Type}, {"Index", Int64.Type}, {"Month Number", Int64.Type}, {"Quarter Number", Int64.Type}, {"Month Name", type text}, {"Quarter Year", type text}, {"Year", Int64.Type}}), #"Added Conditional Column" = Table.AddColumn(#"Changed Type2", "Fiscal Year", each if [Month Number] < #"Fiscal Start Month" then [Year] else [Year]+1 ), #"Added Conditional Column1" = Table.AddColumn(#"Added Conditional Column", "Fiscal Month", each if [Month Number] < #"Fiscal Start Month" then [Month Name] else [Month Name] ), #"Added Custom7" = Table.AddColumn(#"Added Conditional Column1", "Fiscal Month Sort Order", each Number.Mod(Date.Month([Date])+FiscalMonthCalc ,12)+1), #"Added Conditional Column3" = Table.AddColumn(#"Added Custom7", "Fiscal Quarter", each if [Fiscal Month Sort Order] >= 1 and [Fiscal Month Sort Order] <= 3 then "Q1" else if [Fiscal Month Sort Order] >= 4 and [Fiscal Month Sort Order] <= 6 then "Q2" else if [Fiscal Month Sort Order] >= 7 and [Fiscal Month Sort Order] <= 9 then "Q3" else if [Fiscal Month Sort Order] >= 10 and [Fiscal Month Sort Order] <= 12 then "Q4" else "Q Unknown" ), #"Added Conditional Column4" = Table.AddColumn(#"Added Conditional Column3", "Fiscal Quarter Sort Number", each if [Fiscal Month Sort Order] >= 1 and [Fiscal Month Sort Order] <= 3 then "1" else if [Fiscal Month Sort Order] >= 4 and [Fiscal Month Sort Order] <= 6 then "2" else if [Fiscal Month Sort Order] >= 7 and [Fiscal Month Sort Order] <= 9 then "3" else if [Fiscal Month Sort Order] >= 10 and [Fiscal Month Sort Order] <= 12 then "4" else "Q Unknown" ), #"Changed Type3" = Table.TransformColumnTypes(#"Added Conditional Column4",{{"Fiscal Quarter Sort Number", Int64.Type}, {"Fiscal Month Sort Order", Int64.Type}, {"Fiscal Year", Int64.Type}}), #"Renamed Columns3" = Table.RenameColumns(#"Changed Type3",{{"Date", "Calendar Date"}, {"Month Number", "Calendar Month Number"}, {"Month Name", "Calendar Month Name"}, {"Quarter Number", "Calendar Quarter Number"}, {"Quarter Year", "Calendar Quarter Year"}, {"Short Year", "Calendar Short Year"}, {"Year", "Calendar Year"}}) in #"Renamed Columns3", #"Duplicated Column" = Table.DuplicateColumn(Date, "Calendar Date", "Calendar Date - Copy"), #"Calculated Week of Year" = Table.TransformColumns(#"Duplicated Column",{{"Calendar Date - Copy", Date.WeekOfYear}}), #"Renamed Columns" = Table.RenameColumns(#"Calculated Week of Year",{{"Calendar Date - Copy", "Week Number of Year"}}), #"Duplicated Column1" = Table.DuplicateColumn(#"Renamed Columns", "Calendar Date", "Calendar Date - Copy"), #"Calculated Week of Month" = Table.TransformColumns(#"Duplicated Column1",{{"Calendar Date - Copy", Date.WeekOfMonth}}), #"Renamed Columns1" = Table.RenameColumns(#"Calculated Week of Month",{{"Calendar Date - Copy", "Week Number of Month"}}) in #"Renamed Columns1" - Then click Done
- Now you should see your Date Table with the Fiscal Attributes created.

Next I will show you how by changing the Fiscal Start Month how it dynamically changes the Fiscal Month Sort Order and Fiscal Quarter
- As with our current example it is setup with the Fiscal Start Month of 7.
-
So the month of January will be the 7th Fiscal Month starting from July.
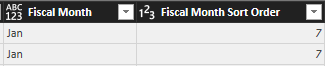
- As well the Fiscal Quarter will be Q3.
-
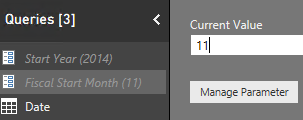
Now I will change the Fiscal Start Month to 11
- Click on the Fiscal Start Month and then change it from 7 to 11
-
As you can see below it currently is set to 7
-
And once done it is now changed to 11
-
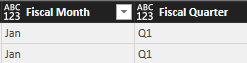
Now when you go back to your Date table you will see the following changes.
-
For the Month of January, the Fiscal Month Sort Order will be 3
-
And the Fiscal Quarter will be Q1
-
- You can try this for yourself and modify the parameters as required.

Technical overview on how I created the Fiscal Attributes
For the people who want to simply copy and paste and get it working you can skip to the conclusion, but for the people who want to understand how I did this please read below.
I had to come up with a way to get the right Fiscal Month Sort Order where the input could be dynamically driven. I did a fair bit of searching until I found someone who had done it in Excel, after which I modified it so that it would work with Power Query as well as bring back the right Fiscal Month Sort Order.
This is the code below, with the explanation afterwards.
-
The first part is where I created the FiscalMonthCalc
FiscalMonthCalc = 12-#”Fiscal Start Month”,
- What I am doing above is taking the total months in a year (12) and subtracting the Fiscal Start Month Parameter
- This will be used in the code below so that we can get the right output.
-
Next is where I created the Fiscal Month Sort Order with the code below.
Number.Mod(Date.Month([Date])+FiscalMonthCalc
,12)+1
- As you can see above the first part highlighted in GREEN is where I am using the Mod (Divides two numbers and returns the remainder of the resulting number.)
- In the next section is where I am getting the Month Number from the current Date row in the Date table highlighted in PURPLE
-
Now in order to get the number for our Mod, I then added this to my FiscalMonthCalc highlighted in RED
- I had to do this in order to get the number for our Mod to be correct.
- Then I next put in the divisor for our Mod which was 12 due to their being the 12 months of the year highlighted in ORANGE
- The final part is where I had to increment the number by 1 to show the correct Fiscal Month Sort Order highlighted in BLUE
Then in order to create the Fiscal Quarter and Fiscal Quarter Sort Number I could then use the Fiscal Month Sort Order column created above.
This is the amazing thing with Power Query is that once I created my column I needed the next steps to create the Fiscal Quarter was as easy as defining our Quarters as we know which is every 3 months as shown below with the sample code.
#”Added Conditional Column3″ = Table.AddColumn(#”Added Custom7″, “Fiscal Quarter”, each if [Fiscal Month Sort Order] >= 1 and [Fiscal Month Sort Order] <= 3 then “Q1”
else if [Fiscal Month Sort Order] >= 4 and [Fiscal Month Sort Order] <= 6 then “Q2”
else if [Fiscal Month Sort Order] >= 7 and [Fiscal Month Sort Order] <= 9 then “Q3”
else if [Fiscal Month Sort Order] >= 10 and [Fiscal Month Sort Order] <= 12 then “Q4”
else “Q Unknown” ),
And because it is all driven off the Fiscal Month Sort Order it will always be correct due to being dynamically created.
Conclusion and download File
So in conclusion here is an easy way to create a Date table with Fiscal Periods that you can modify to your specific requirements.
Here is a link where you can download an example file: Creating Date Table with Fiscal Attributes.pbix
Thanks Gilbert! I am already utilizing the download file:
One question:
I noticed ‘Fiscal Year’ doesn’t change to the next year until Aug 1, which is ‘Fiscal Month’ 2 (when Fiscal Start Month parameter is set to 7) – Is this an error or am I missing something?
Thanks again,
– Kurt
Hi there Kurk,
You were indeed correct and apologies for me not updating the PBIX file. I have since updated the file and validated that it now works as expected.
If you can please download the file again from the link at the bottom of the blog post.
Fantastic!
Thank-you much for updating the file; I just downloaded it…and now I have another potential problem (hate to be a nuisance)…
The table seems to only want to show 2016 values regardless of the year that is entered into the year parameter; ie: if I enter 2010 as the start year, the table still only shows 2016 dates (Jan1 – today). So, is this a user error or is the parameter not working properly?
Thanks again,
Kurt
Hi there Kurt, no problem at all.
The issue was that in the steps under the Date Table in the Query Editor I had filtered out the rows for only 2016. Once I removed the filter it showed all the data.
So if you can please re-download it, it will have the years from 2011 – 2016.
Ahh – somehow I missed that…
Okay, everything looks great now; I appreciate your quick responses.
I will certainly be using this calendar table often – thanks for creating and posting the file.
– Kurt
Glad it is now working, and happy to help out.
Hi Gilbert – I have noticed that the current day is not being generated, I only get today-1.
Cheers,
Stefan
Hi there Stefan,
Can I ask if you did refresh the dataset? Because it would need to be refreshed to get the current date.
Regards
Gilbert
Hi Gilbert,
sure, I did refresh the dataset. Maybe it has to do with the fact that I am in different time zone (PST-9). But anyway – even if I do refesh during the end of my day, still the current day is missing. Weired …
Best,
Stefan
Hi there Stefan,
I found the issue, it was when I was building up the start and end date range.
If you can go into the advanced editor and replace the following line
#”Invoked FunctionSource” = Source(#date(#”Start Year”, 1, 1), Duration.Days(DateTime.Date(DateTime.FixedLocalNow()) – #date(#”Start Year”,1,1)), #duration(1, 0, 1, 0)),
If you notice, for the last #duration there is a 1 second to last. So what this does is to include the current date as the last date.
I will be uploading this workbook with the change also, if you wish to just download it again.
Thanks Gilbert! There still is some sort of bug in the code. If I refresh the adjusted version you have deployed, it works alright. If I change the start date to e.g. 2015, it is again not working and the current day is missing…
Best,
Stefan
Hi there I am not sure why that is happening. I just refreshed my copy now and it gave me the date of 03 Nov 2016.
If you are still stuck I can email you directly, and possibly send me your copy to see what is happening?
Hi, i used your fiscal table however i need an end date of 30th June 2025…it seems to only go up to Fiscal Dec 2017 year? Can we specify an end date for the date dimension table ?
Hi Garry, you can change the following line as shown below
#”Invoked FunctionSource” = Source(#date(#”Start Year”, 1, 1), Duration.Days(DateTime.Date(Date.AddYears(DateTime.FixedLocalNow(),+10)) – #date(#”Start Year”,1,1)), #duration(1, 0, 0, 0)),
Please notice above where there is the +10 this adds 10 years from today’s date.
Hey Gilbert, solved this with an end table parameter (Kudos to Steve Wheeler on PBI Community)
Add an “End Year” parameter, and then amend the script line to:
#”Invoked FunctionSource” = Source(#date(#”Start Year”, 1, 1), Duration.Days(#date(#”End Year”, 12, 30) – #date(#”Start Year”,1,1)), #duration(1, 0, 1, 0)),
Cheers Again.
Hello Gilbert, thanks for that i get a token Identifier expected error in regards to #duration
Here is cut and paste of the line
#”Invoked FunctionSource” = Source(#date(#”Start Year”, 1, 1), Duration.Days(DateTime.Date(DateTime.FixedLocalNow(),+10)) – #date(#”Start Year”,1,1)), #duration(1, 0, 1, 0)),
It would be fantastic if you can specify a End date in your Manage parameters if that is possible?
Thanks for posting that Garry. Will come in handy
Hey Gilbert, just regard with copying your code text above and following the instructions, i still get an error saying “Token comma expected” . When i click show error it highlights the last word “Sorted”. Can you advise why?
Hi Garry. That either happens when there is a round bracket missing or a comma. It should tell you which line it is on.
Or email me the entire code and I can have a look
Its on the last row, with the words “Sorted”, i just used your PBI file but if i copy and paste the above from your post i get the error.
Hi Garry.
Not sure why that is happening. I will habe to look at the code and see.
Hi there Garry, I have updated the downloaded file. I think the issue was with the copy and paste and some of the text being slightly different. I am thinking it was the comma. But it is all working now.
OK great your downloaded file was actually fine…it was just the copy and paste command from the blog above that gave the expected comma error…all good though cheers for the date dimension table.
Hi Garry, glad you got a version and it is all working now.
Hi Gilbert,
Thank you for providing this. I have a token error but I’m going to review the comments above to see how to resolve it.
However, I am unable to download your powerBI files. OneDrive seems to want to scan the files first and won’t let me download it.
Sincerely,
Kai
Hi there, if you can let me know what the error is, as I thought I had updated it all.
And OneDrive should let you scan it and then download.
Let me know if you get stuck and I can always possibly email it to you?
Hi Gilbert thanks for your reply!
OneDrive isn’t loading for me. It keeps getting hung up at
### OneDrive
“Unable to scan Creating Date Table with Fiscal Attributes.pbix for viruses
OneDrive is unable to scan Creating Date Table with Fiscal Attributes.pbix for viruses.”
###
Regarding the code above, it’s the same as some of the other “Token Comma expected”
And it refers to #’Sorted Rows#
If you could email me, that would be wonderful. Can you see my email from my name?
Hi Gilbert, thank you for the great resource!
Just as a note, there still seems to be an issue with the code above. I copied and pasted it and got the same token error on the final line.
So, I downloaded the PBIX. Looks pretty good.
I added an additional column: “Fiscal Year Display” to show “FY 14-15” or “FY 15-16″, which caused these additional lines to appear in the Advanced Editor:
—-
#”Add Fiscal Year Display” = Table.AddColumn(#”Renamed Columns1″, “Fiscal Year Display”, each “FY “&Text.PadStart(Text.End(Text.From([Fiscal Year]),2),2,”0″)&”-“&Text.PadStart(Text.End(Text.From([Fiscal Year]+1),2),2,”0″))
in
#”Add Fiscal Year Display”
—-
Except, my Fiscal Year starts Dec 1, and the results kept showing July 1.
Digging through the Advanced Editor, I found these two lines:
—-
#”Added Conditional Column” = Table.AddColumn(#”Changed Type2″, “Fiscal Year”, each if [Month Number] <= 6 then [Year] else [Year]+1 ),
#"Added Conditional Column1" = Table.AddColumn(#"Added Conditional Column", "Fiscal Month", each if [Month Number] <= 6 then [Month Name] else [Month Name] ),
—-
The 6th month was hardcoded as the split for the new fiscal year, it seems. Regardless of what the variable "Fiscal Start Month" was set to, the fiscal year kept switching on July 1.
I made this change:
—-
#"Added Conditional Column" = Table.AddColumn(#"Changed Type2", "Fiscal Year", each if [Month Number] <= #"Fiscal Start Month"-1 then [Year] else [Year]+1 ),
#"Added Conditional Column1" = Table.AddColumn(#"Added Conditional Column", "Fiscal Month", each if [Month Number] <= #"Fiscal Start Month"-1 then [Month Name] else [Month Name] ),
—-
Replacing the "6" with the results of the variable "Fiscal Start Month" less 1, and that seems to fix it, at least in the data table. I haven't tried implementing it yet.
Great little bit of code to provide a starting point for anyone who needs a consistent DateTable to work with.
Thanks!
Dion
Thanks Dion for the great comments as well as explaining what you did to get it working.
I do think that the font on the web page is causing the issue when copying and pasting and I will look into that today.
As well as looking as to why I hard coded the Fiscal Years. And once I have updated that I will then let you know so that it can be dynamic going forward.
[…] NOTE: As with almost all Power BI Models, this is going to be leveraging off my Date table that I created. If you want to know how to create your own Date table you can follow my blog post Power BI – How to Easily Create Dynamic Date Table/Dimension with Fiscal Attributes using Power Qu… […]
[…] I did it using my blog post: Power BI – How to Easily Create Dynamic Date Table/Dimension with Fiscal Attributes using Power Qu… […]
If you are going for best contents like I do, only pay a visit this web site
every day for the reason that it provides quality
contents, thanks
Thanks for the kind words, I do hope you find the content useful.
Hi Gilbert, when I change the Start Year to 2009 some dates are removed from the Date table. An example is 21-Nov-2016. When I change the Start Year back to 2011, 21-Nov-2016 is back again. Am I missing something? Thanks
Hi there, it should be working as expected.
Did you try downloading the example file and copy and pasting from within the downloaded file? This is just to make sure that there was not something changed when doing a copy and paste from the webpage?
It is within the example file that I found the issue. As a test, change the Start Year to 2009 and refresh then check if you find 21-Nov-2016
Hi Leo, I had a look and there is something weird going on, but from my actual code I do not remove any data from within the table. I wonder if this is some type of a bug with the List.Dates?
Hi Gilbert, thanks for the feedback
Hi Leo I was working on this date table and I found the root cause of the error. I had set the ending date and used the #duration(1, 0, 1, 0)) where it should have been set to #duration(1, 0, 0, 0))
I have updated the code in this blog post as well as the associated downloaded PBIX file.
Thanks I will have a look and let you know why that is occuring from the example.
Hi Gilbert,
I set the parameters to 2017 and fiscal month 7.
I have noticed that week of the year number is incorrect. The second week of the year starts on second row 2/01/2017 when it should start on the 9/01/2017.
Thanks
Hi Cameron, that is indeed correct.
If you have to go and have a look at the calendar for 2016, you will see that the 1 Jan 2017 falls into the first week of the year. And 02 Jan 2017 which is a Monday, is actually the second week of the year. Even though 01 Jan 2017 only has got one day, it is still considered a week.
Hi Gilbert,
I would like to use this type of Date table with a Period Table, but keep getting this “Expression.Error: We cannot apply operator & to types Text and Number.
Details:
Operator=&
Left=2016-
Right=2”
I have been looking at this article and the “Create Dynamic Periods for Fiscal or Calendar Dates in Power BI”
http://www.fourmoo.com/2016/09/07/create-dynamic-periods-for-fiscal-or-calendar-dates-in-power-bi/
Is there a way that I can bring these two concepts together?
I’m very new at this so please bear with me. Thanks!
Hi there, when that error occurs it is due to one column having a data type of Text and the other being of Number.
One way is where you have the Number column change it to Text, do this one step before your error. That should then solve the problem?
Let me know if you still get stuck.
Thanks, Gilbert. I had to change my Fiscal Start Month and Fiscal End Month parameters’ type to “Text.” But by doing so, I now get an error in my Date table for my fiscal columns.
I’m using your M code for the Date table and Period table. It seems that the Fiscal Start Month and Fiscal End Month parameters’ type needs to be “Decimal Number” for the Date table and “Text” for the Period table and the Start Year Parameter type is “Decimal Number” (if I change it the whole Date table freaks out).
I’m assuming that I need to adjust the below M Code for the Period table. Instead of using the line
LastYearText = Number.ToText(Date.Year(Date.AddYears(Date.From(Date.StartOfYear(TodaysDate)),-1))),
use the Start Year parameter? But I’m not sure what that would like? I’ve tried something like
LastYearText = Number.ToText(Date.Year(Date.AddYears(Date.From(“””&#”Start Year”(TodaysDate)),-1))),
and keep getting a “Token Comma expected” error.
Do I need to tell the Period table to use the Start Year parameter? What am I missing?
Thanks again for your help!
Hi Gilbert,
Looking for a solution that will do this but allow you to specify a start day for the beginning of the fiscal year – my client starts their fiscal year on 27/07 – but I haven’t seen anything like that amongst the myriad of posts on this topic.
Have you seen anything like this?
Thanks!
Matt
Hi Matt, I am sure that I can put something together which would specify the start date.
Would it then require that everything else related to this start date being the 27th of each month in terms of Fiscal Months and Quarters?
Hi – very good question! Whilst the business requirement appears to be as you state, I am reviewing the current reporting and it is based on calendar months after the initial 27/07 start (not sure they’re aware its like that though!)…I will confirm what they need and get back to you.
Many thanks for your help and keep up the good work!
I really enjoyed your Unicode character posts 🙂
Regards,
Matt
Hi Matt,
Let’s see what they get back to you with and take it from there. As they might find out what they think and what is happening is different.
Thanks with regards to the Unicode character post. What I did the other day was to rename the column and make it have no name. Which you can then use in a table and make the column nice and small.
Regards
Gilbert
Awesome work, this is the closest I have seen to what I am looking for in a date table. The only thing missing is a “week of fiscal year” column. Would you have any thoughts on how to get that set up? Thanks again for putting this together,
jw
That is a great question, let me have a look and see what I can do. I know I can get it done.
Regards
Gilbert
Hi JW, please find the M Syntax below which now has got the Fiscal Week or as you requested “Week of Fiscal Year”
You will see that I had to put in some details around how to find the right Week of Year based on the Calendar table and then use this to get the correct Week for the Fiscal Year. And ensure that if you had to change your Fiscal Start Year that it would change correct.
If you have any questions please let me know.
let#"Fiscal Start Week" = Date.WeekOfYear(Date.From("01/" & Text.From(#"Fiscal Start Month") & "/" & Text.From(#"End Year"))),
Date = let
Source = List.Dates,
FiscalMonthCalc = 12-#"Fiscal Start Month",
// 1. Uncomment this line if you want to get your end date being Today's Date of the Refresh
#"Invoked FunctionSource" = Source(#date(#"Start Year", 1, 1), Duration.Days(DateTime.Date(DateTime.FixedLocalNow()) - #date(#"Start Year",1,1)), #duration(1, 0, 0, 0)),
// 2. Uncomment this line below if you want your end date to be 4 years into the future
//#"Invoked FunctionSource" = Source(#date(#"Start Year", 1, 1), Duration.Days(DateTime.Date(Date.AddDays(Date.EndOfYear(Date.AddYears(DateTime.FixedLocalNow(),+4)),-1)) - #date(#"Start Year",1,1)), #duration(1, 0, 0, 0)),
// 3. Uncomment this line if you want to get your end date being the Parameter called "End Year"
//#"Invoked FunctionSource" = Source(#date(#"Start Year", 1, 1), Duration.Days(#date(#"End Year", 12, 30) - #date(#"Start Year",1,1)), #duration(1, 0, 0, 0)),
#"Table from List" = Table.FromList(#"Invoked FunctionSource", Splitter.SplitByNothing(), null, null, ExtraValues.Error),
#"Added Index" = Table.AddIndexColumn(#"Table from List", "Index", 1, 1),
#"Renamed Columns" = Table.RenameColumns(#"Added Index",{{"Column1", "Date"}}),
#"Added Custom" = Table.AddColumn(#"Renamed Columns", "Year", each Date.Year([Date])),
#"Added Custom1" = Table.AddColumn(#"Added Custom", "Month Number", each Date.Month([Date])),
#"Added Custom2" = Table.AddColumn(#"Added Custom1", "Day", each Date.Day([Date])),
#"Added Custom3" = Table.AddColumn(#"Added Custom2", "Day Name", each Date.ToText([Date],"ddd")),
#"Added Custom4" = Table.AddColumn(#"Added Custom3", "Month Name", each Date.ToText([Date],"MMM")),
#"Reordered Columns" = Table.ReorderColumns(#"Added Custom4",{"Date", "Index", "Year", "Month Number", "Month Name", "Day", "Day Name"}),
#"Added Custom5" = Table.AddColumn(#"Reordered Columns", "Quarter Number", each Date.QuarterOfYear([Date])),
#"Duplicated Column" = Table.DuplicateColumn(#"Added Custom5", "Year", "Copy of Year"),
#"Renamed Columns1" = Table.RenameColumns(#"Duplicated Column",{{"Copy of Year", "Short Year"}}),
#"Changed Type" = Table.TransformColumnTypes(#"Renamed Columns1",{{"Short Year", type text}}),
#"Split Column by Position" = Table.SplitColumn(#"Changed Type","Short Year",Splitter.SplitTextByRepeatedLengths(2),{"Short Year.1", "Short Year.2"}),
#"Changed Type1" = Table.TransformColumnTypes(#"Split Column by Position",{{"Short Year.1", Int64.Type}, {"Short Year.2", Int64.Type}}),
#"Removed Columns" = Table.RemoveColumns(#"Changed Type1",{"Short Year.1"}),
#"Renamed Columns2" = Table.RenameColumns(#"Removed Columns",{{"Short Year.2", "Short Year"}}),
#"Added Custom6" = Table.AddColumn(#"Renamed Columns2", "Quarter Year", each Number.ToText([Short Year]) & "Q" & Number.ToText([Quarter Number],"00")),
#"Reordered Columns1" = Table.ReorderColumns(#"Added Custom6",{"Index", "Date", "Day", "Day Name", "Month Number", "Month Name", "Quarter Number", "Quarter Year", "Short Year", "Year"}),
#"Changed Type2" = Table.TransformColumnTypes(#"Reordered Columns1",{{"Date", type date}, {"Day", Int64.Type}, {"Index", Int64.Type}, {"Month Number", Int64.Type}, {"Quarter Number", Int64.Type}, {"Month Name", type text}, {"Quarter Year", type text}, {"Year", Int64.Type}}),
#"Added Conditional Column" = Table.AddColumn(#"Changed Type2", "Fiscal Year", each if [Month Number] < #"Fiscal Start Month" then [Year] else [Year]+1 ), #"Added Conditional Column1" = Table.AddColumn(#"Added Conditional Column", "Fiscal Month", each if [Month Number] < #"Fiscal Start Month" then [Month Name] else [Month Name] ), #"Added Custom7" = Table.AddColumn(#"Added Conditional Column1", "Fiscal Month Sort Order", each Number.Mod(Date.Month([Date])+FiscalMonthCalc ,12)+1), #"Added Conditional Column3" = Table.AddColumn(#"Added Custom7", "Fiscal Quarter", each if [Fiscal Month Sort Order] >= 1 and [Fiscal Month Sort Order] <= 3 then "Q1" else if [Fiscal Month Sort Order] >= 4 and [Fiscal Month Sort Order] <= 6 then "Q2" else if [Fiscal Month Sort Order] >= 7 and [Fiscal Month Sort Order] <= 9 then "Q3" else if [Fiscal Month Sort Order] >= 10 and [Fiscal Month Sort Order] <= 12 then "Q4" else "Q Unknown" ), #"Added Conditional Column4" = Table.AddColumn(#"Added Conditional Column3", "Fiscal Quarter Sort Number", each if [Fiscal Month Sort Order] >= 1 and [Fiscal Month Sort Order] <= 3 then "1" else if [Fiscal Month Sort Order] >= 4 and [Fiscal Month Sort Order] <= 6 then "2" else if [Fiscal Month Sort Order] >= 7 and [Fiscal Month Sort Order] <= 9 then "3" else if [Fiscal Month Sort Order] >= 10 and [Fiscal Month Sort Order] <= 12 then "4" else "Q Unknown" ), #"Changed Type3" = Table.TransformColumnTypes(#"Added Conditional Column4",{{"Fiscal Quarter Sort Number", Int64.Type}, {"Fiscal Month Sort Order", Int64.Type}, {"Fiscal Year", Int64.Type}}), #"Renamed Columns3" = Table.RenameColumns(#"Changed Type3",{{"Date", "Calendar Date"}, {"Month Number", "Calendar Month Number"}, {"Month Name", "Calendar Month Name"}, {"Quarter Number", "Calendar Quarter Number"}, {"Quarter Year", "Calendar Quarter Year"}, {"Short Year", "Calendar Short Year"}, {"Year", "Calendar Year"}}) in #"Renamed Columns3", #"Duplicated Column" = Table.DuplicateColumn(Date, "Calendar Date", "Calendar Date - Copy"), #"Calculated Week of Year" = Table.TransformColumns(#"Duplicated Column",{{"Calendar Date - Copy", Date.WeekOfYear}}), #"Renamed Columns" = Table.RenameColumns(#"Calculated Week of Year",{{"Calendar Date - Copy", "Week Number of Year"}}), #"Duplicated Column1" = Table.DuplicateColumn(#"Renamed Columns", "Calendar Date", "Calendar Date - Copy"), #"Calculated Week of Month" = Table.TransformColumns(#"Duplicated Column1",{{"Calendar Date - Copy", Date.WeekOfMonth}}), #"Renamed Columns1" = Table.RenameColumns(#"Calculated Week of Month",{{"Calendar Date - Copy", "Week Number of Month"}}), #"Added Custom" = Table.AddColumn(#"Renamed Columns1", "Start Date of Week", each Date.StartOfWeek([Calendar Date], Day.Monday)), #"Added Custom1" = Table.AddColumn(#"Added Custom", "End Date of Week", each Date.EndOfWeek([Calendar Date], Day.Monday)), #"Added Custom2" = Table.AddColumn(#"Added Custom1", "Week Start & End Date", each Date.ToText(Date.StartOfWeek([Calendar Date], Day.Monday),"MM/dd") & "-" & Date.ToText(Date.EndOfWeek([Calendar Date], Day.Monday),"MM/dd")), #"Added Fiscal Week" = Table.AddColumn(#"Added Custom2", "Week of Fiscal Year", each if [Calendar Month Number] < #"Fiscal Start Month" then #"Fiscal Start Week" + [Week Number of Year]-2 else (#"Fiscal Start Week" -[Week Number of Year])*(-1)+1) in #"Added Fiscal Week"
I have been trying about codes but I am getting error in Fiscal quarter sort number & week of fiscal year.
Thanks, Gilbert! Great work. The only issue I am facing is the day of refresh is yesterday’s date. We follow CST. I am not sure how to fix that.
Hi there
Here is a link to a blog post where I explain how to use daylight savings time. Which should also help with the issue you are facing. It too has got a PBIX file to download.
Daylight Savings PBIX
This is a fantastic write up, I am trying to adapt this to a slightly different approach for my needs. We operate with a semi standard fiscal year (Jan-Dec) with the only differences being I need to start my fiscal date table on a physical date (12/30/2012) as my week 1 and from that point forward every 7days advances my weeks and only 2014 would be a 53week year.
I have been working to modify your M Query code and unsuccessful at this point. Any and all help you can offer would be fantastic.
Hi Adam, thanks for the comment and question.
Just a question from me with regards to your starting week being 12/30/2012, would it always be the 30th of December of each year that it must start at week 1?
Thank you for the reply, in my case the starting point for my data FY2013 is 12/30/2012 and that is considered our week one, our next week one is 12/29/2013 for FY2014, then 1/4/2015 for FY2015.
Each FY is spaced out by 7day weeks with most years (2014 excluded) are proper 52week years.
[…] Reference creating the date table: Power BI – How to Easily Create Dynamic Date Table/Dimension with Fiscal Attributes using Power Qu… […]
Dear Gilbert,
I’m completely new to the Power BI and I’ve got only six months of experience working on it. Can I seek your advice to work on the Financial Year 2015 – Financial Year 2020? While, our fiscal year starts in the month of March and ends up in the month April every year.
Interestingly, I’ve copied your code and started working around it. Its seems fine until 2017 and when I’ve tried to extend the End Year the entire thing has been end up in syntax error. Moreover, when I try to add the fiscal quarter to the financial data the month chronological orders flows from Mar to Dec of the fiscal year and shows up the Nov and Dec of the next year. I’d glad to send the screen shot, if you would be able to help me up on it. Kindly, lemme know your thoughts about it.
You’re really doing a great job Gilbert! Thank you for all your postings and code in the blog.
Best regards,
Peter.
Hi Peter,
Thanks for the kind words.
If you could please send me a screenshot that would be ideal.
What I can also do is to email you which might make it easier to get the screenshots.
Regards
Gilbert
Yes, please send an email to my address. I’d be able to get the screen shot of it.
Another question, it appears that based on your question, the Fiscal Year starts in March (03) and ends in April (04) meaning that there is a month overlap for each fiscal year?
Sorry for depicting about the fiscal year incorrectly. Our financial year months start in the year of April and ends in the month of March.
Dear Gilbert,
It’s really priceless to have someone like you with such a spontaneous response.
Thank you for all the warm and extensive support offered to me.
Best Regards,
Peter.
Dear Gilbert,
this is really the best piece of Date Table code for PowerBi I’ve seen.
However, Fiscal Week is not calculated properly. It starts on 1st of April, which is OK, but then the numbers of Week are not calculated correctly.
Could you please check the code, because I’m struggling with this quite a long time. 🙂
Thank you and best regards,
Matic
Hi there, sorry about taking so long to reply.
If you could please go to the step called “Added Fiscal Week” and replace it with the code below.
if [Calendar Month Number] < #"Fiscal Start Month" then
  (Date.WeekOfYear(Date.From(Text.From("31/12/" & Text.From([Calendar Year]))))
  -
  #"Fiscal Start Week" + [Week Number of Year])
else (#"Fiscal Start Week" -[Week Number of Year])*(-1)+1
Hi Gilbert,
thank you very much for your response and all your help. This code is much better and works for year 2016 and 2017 perfect and week starts on Monday. In 2018 1st of April is Sunday, calendar week 13, but fiscal week 0. After that everything seems ok, also for 2019 and 2020. Where’s the catch?
Thank you for being so much helpful and best regards,
Matic
Hi – great post – just what I was looking for.
In reading through this I found two lines that can be tightened up a bit. Once you have the Fiscal Month Sort Order, you can divide by 3 and get the Fiscal Quarter and Round Up. You can also just extract the number from the Fiscal Quarter to get the Fiscal Quarter Sort.
Thus this:
#”Added Conditional Column3″ = Table.AddColumn(#”Added Custom7″, “Fiscal Quarter”, each if [Fiscal Month Sort Order] >= 1 and [Fiscal Month Sort Order] = 4 and [Fiscal Month Sort Order] = 7 and [Fiscal Month Sort Order] = 10 and [Fiscal Month Sort Order] = 1 and [Fiscal Month Sort Order] = 4 and [Fiscal Month Sort Order] = 7 and [Fiscal Month Sort Order] = 10 and [Fiscal Month Sort Order] <= 12 then "4"
else "Q Unknown" ),
Become this:
#"Added Conditional Column3" = Table.AddColumn(#"Added Custom7", "Fiscal Quarter", each "Q" & Number.ToText(Number.RoundUp([Fiscal Month Sort Order] / 3))),
#"Added Conditional Column4" = Table.AddColumn(#"Added Conditional Column3", "Fiscal Quarter Sort", each Number.FromText(Text.End([Fiscal Quarter], 1))),
Hi Nick,
Thanks for the suggestion and I will update my code and see if it works as you detailed above.
Many thanks for sharing this with me and the readers of my blog.
[…] which is another recommendation to have in every data model, and you can refer to my blog post Power BI – How to Easily Create Dynamic Date Table/Dimension with Fiscal Attributes using Power Qu… which explains how to create the date […]
Hello, I have been trying to use your Fiscal Year calendar “M” codes but it does not work. I am getting error in my date table. Our fiscal year starts from February not from January. follow exactly your codes but I am getting error. can you please help me where I am wrong. Columns “Fiscal Year – Error” & “Fiscal Month – Error” & Fiscal Quarter – Error” & Fiscal Quarter sort Number – error”
Hi there
I changed the Fiscal Start Year to 2 and it worked as expected.
Please find below the code that I tried in the Date table
let
/////////////////////////////////////////////////////////////////////////////////////////////////////////////////////////////////////
// Oct 2017: This is so that I can work out if Daylight Savings Should be applied and Offset by How Many Hours
// Need to get the Current Date Time into Variable, then use this below with Parameter values to get the output to be used
// later for other Offset Timings that use the #duration syntax
/////////////////////////////////////////////////////////////////////////////////////////////////////////////////////////////////////
#"Current Date" = Date.From(DateTimeZone.FixedLocalNow()+ #duration(0,#"UTC Offset",0,0)),
#"Time Offset in Hours" = if #"Current Date" >= #"Daylight Savings Start Date" and #"Current Date" <= #"Daylight Savings End Date" then (#"UTC Offset") - (#"Daylight Savings Hour Offset") else #"UTC Offset", ///////////////////////////////////////////////////////////////////////////////////////////////////////////////////////////////////// // 20-Sep 2017: This is to get the Week of the Year, based on the Fiscal Start Month, which is used later in this query. ///////////////////////////////////////////////////////////////////////////////////////////////////////////////////////////////////// #"Fiscal Start Week" = Date.WeekOfYear(Date.From("01/" & Text.From(#"Fiscal Start Month") & "/" & Text.From(#"End Year"))), Date = let Source = List.Dates, FiscalMonthCalc = 12-#"Fiscal Start Month", ///////////////////////////////////////////////////////////////////////////////////////////////////////////////////////////////////// // 1. Uncomment this line if you want to get your end date being Today's Date of the Refresh ///////////////////////////////////////////////////////////////////////////////////////////////////////////////////////////////////// //#"Invoked FunctionSource" = Source(#date(#"Start Year", 1, 1), Duration.Days(DateTime.Date(DateTime.FixedLocalNow()) - #date(#"Start Year",1,1)), #duration(1, 0, 0, 0)), ///////////////////////////////////////////////////////////////////////////////////////////////////////////////////////////////////// // 2. Uncomment this line below if you want your end date to be 4 years into the future ///////////////////////////////////////////////////////////////////////////////////////////////////////////////////////////////////// #"Invoked FunctionSource" = Source(#date(#"Start Year", 1, 1), Duration.Days(DateTime.Date(Date.AddDays(Date.EndOfYear(Date.AddYears(DateTime.FixedLocalNow(),+4)),-1)) - #date(#"Start Year",1,1)), #duration(1, 0, 0, 0)), ///////////////////////////////////////////////////////////////////////////////////////////////////////////////////////////////////// // 3. Uncomment this line if you want to get your end date being the Parameter called "End Year" ///////////////////////////////////////////////////////////////////////////////////////////////////////////////////////////////////// //#"Invoked FunctionSource" = Source(#date(#"Start Year", 1, 1), Duration.Days(#date(#"End Year", 12, 30) - #date(#"Start Year",1,1)), #duration(1, 0, 0, 0)), #"Table from List" = Table.FromList(#"Invoked FunctionSource", Splitter.SplitByNothing(), null, null, ExtraValues.Error), #"Added Index" = Table.AddIndexColumn(#"Table from List", "Index", 1, 1), #"Renamed Columns" = Table.RenameColumns(#"Added Index",{{"Column1", "Date"}}), #"Added Custom" = Table.AddColumn(#"Renamed Columns", "Year", each Date.Year([Date])), #"Added Custom1" = Table.AddColumn(#"Added Custom", "Month Number", each Date.Month([Date])), #"Added Custom2" = Table.AddColumn(#"Added Custom1", "Day", each Date.Day([Date])), #"Added Custom3" = Table.AddColumn(#"Added Custom2", "Day Name", each Date.ToText([Date],"ddd")), #"Added Custom4" = Table.AddColumn(#"Added Custom3", "Month Name", each Date.ToText([Date],"MMM")), #"Reordered Columns" = Table.ReorderColumns(#"Added Custom4",{"Date", "Index", "Year", "Month Number", "Month Name", "Day", "Day Name"}), #"Added Custom5" = Table.AddColumn(#"Reordered Columns", "Quarter Number", each Date.QuarterOfYear([Date])), #"Duplicated Column" = Table.DuplicateColumn(#"Added Custom5", "Year", "Copy of Year"), #"Renamed Columns1" = Table.RenameColumns(#"Duplicated Column",{{"Copy of Year", "Short Year"}}), #"Changed Type" = Table.TransformColumnTypes(#"Renamed Columns1",{{"Short Year", type text}}), #"Split Column by Position" = Table.SplitColumn(#"Changed Type","Short Year",Splitter.SplitTextByRepeatedLengths(2),{"Short Year.1", "Short Year.2"}), #"Changed Type1" = Table.TransformColumnTypes(#"Split Column by Position",{{"Short Year.1", Int64.Type}, {"Short Year.2", Int64.Type}}), #"Removed Columns" = Table.RemoveColumns(#"Changed Type1",{"Short Year.1"}), #"Renamed Columns2" = Table.RenameColumns(#"Removed Columns",{{"Short Year.2", "Short Year"}}), #"Added Custom6" = Table.AddColumn(#"Renamed Columns2", "Quarter Year", each Number.ToText([Short Year]) & "Q" & Number.ToText([Quarter Number],"00")), #"Reordered Columns1" = Table.ReorderColumns(#"Added Custom6",{"Index", "Date", "Day", "Day Name", "Month Number", "Month Name", "Quarter Number", "Quarter Year", "Short Year", "Year"}), #"Changed Type2" = Table.TransformColumnTypes(#"Reordered Columns1",{{"Date", type date}, {"Day", Int64.Type}, {"Index", Int64.Type}, {"Month Number", Int64.Type}, {"Quarter Number", Int64.Type}, {"Month Name", type text}, {"Quarter Year", type text}, {"Year", Int64.Type}}), #"Added Conditional Column" = Table.AddColumn(#"Changed Type2", "Fiscal Year", each if [Month Number] < #"Fiscal Start Month" then [Year] else [Year]+1 ), #"Added Conditional Column1" = Table.AddColumn(#"Added Conditional Column", "Fiscal Month", each if [Month Number] < #"Fiscal Start Month" then [Month Name] else [Month Name] ), #"Added Custom7" = Table.AddColumn(#"Added Conditional Column1", "Fiscal Month Sort Order", each Number.Mod(Date.Month([Date])+FiscalMonthCalc ,12)+1), #"Added Conditional Column3" = Table.AddColumn(#"Added Custom7", "Fiscal Quarter", each if [Fiscal Month Sort Order] >= 1 and [Fiscal Month Sort Order] <= 3 then "Q1" else if [Fiscal Month Sort Order] >= 4 and [Fiscal Month Sort Order] <= 6 then "Q2" else if [Fiscal Month Sort Order] >= 7 and [Fiscal Month Sort Order] <= 9 then "Q3" else if [Fiscal Month Sort Order] >= 10 and [Fiscal Month Sort Order] <= 12 then "Q4" else "Q Unknown" ), #"Added Conditional Column4" = Table.AddColumn(#"Added Conditional Column3", "Fiscal Quarter Sort Number", each if [Fiscal Month Sort Order] >= 1 and [Fiscal Month Sort Order] <= 3 then "1" else if [Fiscal Month Sort Order] >= 4 and [Fiscal Month Sort Order] <= 6 then "2" else if [Fiscal Month Sort Order] >= 7 and [Fiscal Month Sort Order] <= 9 then "3" else if [Fiscal Month Sort Order] >= 10 and [Fiscal Month Sort Order] <= 12 then "4" else "Q Unknown" ), #"Changed Type3" = Table.TransformColumnTypes(#"Added Conditional Column4",{{"Fiscal Quarter Sort Number", Int64.Type}, {"Fiscal Month Sort Order", Int64.Type}, {"Fiscal Year", Int64.Type}}), #"Renamed Columns3" = Table.RenameColumns(#"Changed Type3",{{"Date", "Calendar Date"}, {"Month Number", "Calendar Month Number"}, {"Month Name", "Calendar Month Name"}, {"Quarter Number", "Calendar Quarter Number"}, {"Quarter Year", "Calendar Quarter Year"}, {"Short Year", "Calendar Short Year"}, {"Year", "Calendar Year"}}) in #"Renamed Columns3", #"Duplicated Column" = Table.DuplicateColumn(Date, "Calendar Date", "Calendar Date - Copy"), #"Calculated Week of Year" = Table.TransformColumns(#"Duplicated Column",{{"Calendar Date - Copy", Date.WeekOfYear}}), #"Renamed Columns" = Table.RenameColumns(#"Calculated Week of Year",{{"Calendar Date - Copy", "Week Number of Year"}}), #"Duplicated Column1" = Table.DuplicateColumn(#"Renamed Columns", "Calendar Date", "Calendar Date - Copy"), #"Calculated Week of Month" = Table.TransformColumns(#"Duplicated Column1",{{"Calendar Date - Copy", Date.WeekOfMonth}}), #"Renamed Columns1" = Table.RenameColumns(#"Calculated Week of Month",{{"Calendar Date - Copy", "Week Number of Month"}, {"Calendar Year", "Calendar Year"}}), #"Added Custom" = Table.AddColumn(#"Renamed Columns1", "Start Date of Week", each Date.StartOfWeek([Calendar Date], Day.Monday)), #"Added Custom1" = Table.AddColumn(#"Added Custom", "End Date of Week", each Date.EndOfWeek([Calendar Date], Day.Monday)), #"Added Custom2" = Table.AddColumn(#"Added Custom1", "Week Start & End Date", each Date.ToText(Date.StartOfWeek([Calendar Date], Day.Monday),"MM/dd") & "-" & Date.ToText(Date.EndOfWeek([Calendar Date], Day.Monday),"MM/dd")), // 20-Sep-2017: This is the step where I am calculating the Week of Fiscal Year based on the Fiscal Start Week I defined earlier. It also uses the Fiscal Start Month logic to ensure that is dynamic based on the parameter #"Added Fiscal Week - Original" = Table.AddColumn(#"Added Custom2", "Week of Fiscal Year", each if [Calendar Month Number] < #"Fiscal Start Month" then #"Fiscal Start Week" + [Week Number of Year]-2 else (#"Fiscal Start Week" -[Week Number of Year])*(-1)+1), #"Add - Fiscal Week" = Table.AddColumn(#"Added Fiscal Week - Original", "New Fiscal Week", each if [Calendar Month Number] < #"Fiscal Start Month" then (Date.WeekOfYear(Date.From(Text.From("31/12/" & Text.From([Calendar Year])))) - #"Fiscal Start Week" + [Week Number of Year]) else (#"Fiscal Start Week" -[Week Number of Year])*(-1)+1), #"Removed Columns7" = Table.RemoveColumns(#"Add - Fiscal Week",{"Week of Fiscal Year"}), #"Renamed Columns3" = Table.RenameColumns(#"Removed Columns7",{{"New Fiscal Week", "Week of Fiscal Year"}}), #"Added Custom1A" = Table.AddColumn(#"Renamed Columns3", "Year-Month", each Number.ToText( [Calendar Year]) & "-" & Number.ToText( [Calendar Month Number])), #"Changed Type" = Table.TransformColumnTypes(#"Added Custom1A",{{"Year-Month", type text}}), #"Added Custom1B" = Table.AddColumn(#"Changed Type", "Current Year-Month", each Number.ToText(Date.Year(DateTimeZone.FixedLocalNow()+ #duration(0,Number.From(#"Time Offset in Hours"),0,0))) & "-" & Number.ToText(Date.Month(Date.From(DateTimeZone.FixedLocalNow()+ #duration(0,Number.From(#"Time Offset in Hours"),0,0))))), #"CC-Current Year-Month" = Table.AddColumn(#"Added Custom1B", "Is Current Month", each if [#"Year-Month"] = [#"Current Year-Month"] then "Current Month" else "Other Month" ), #"Removed Columns" = Table.RemoveColumns(#"CC-Current Year-Month",{"Year-Month", "Current Year-Month"}), #"Added Custom2A" = Table.AddColumn(#"Removed Columns", "Year-Week", each Number.ToText([Calendar Year]) & "-" & Number.ToText([Week Number of Year])), #"Added Custom3" = Table.AddColumn(#"Added Custom2A", "Current Year-Week", each Number.ToText(Date.Year(DateTimeZone.FixedLocalNow()+ #duration(0,#"Time Offset in Hours",0,0))) & "-" & Number.ToText(Date.WeekOfYear(Date.From(DateTimeZone.FixedLocalNow()+ #duration(0,#"Time Offset in Hours",0,0))))), #"Added Conditional Column1" = Table.AddColumn(#"Added Custom3", "Is Current Week", each if [#"Year-Week"] = [#"Current Year-Week"] then "Current Week" else "Other Week" ), #"Removed Columns1" = Table.RemoveColumns(#"Added Conditional Column1",{"Year-Week", "Current Year-Week"}), #"Added Custom4" = Table.AddColumn(#"Removed Columns1", "Start of Rolling Week Date", each Date.AddDays(Date.From(DateTimeZone.FixedLocalNow()+ #duration(0,#"Time Offset in Hours",0,0)),-6)), #"Added Custom5" = Table.AddColumn(#"Added Custom4", "Current Date", each Date.From(DateTimeZone.SwitchZone(DateTimeZone.FixedLocalNow(),10))), #"Changed Type1" = Table.TransformColumnTypes(#"Added Custom5",{{"Start of Rolling Week Date", type date}, {"Current Date", type date}}), #"Added Conditional Column2" = Table.AddColumn(#"Changed Type1", "Is Rolling Week", each if [Calendar Date] >= [Start of Rolling Week Date] and [Calendar Date] <= [Current Date] then "Current Rolling Week" else "Other Rolling Week"), #"Removed Columns2" = Table.RemoveColumns(#"Added Conditional Column2",{"Start of Rolling Week Date", "Current Date"}), #"Added Current Fiscal Year" = Table.AddColumn(#"Removed Columns2", "Current Fiscal Year", each if Date.Month(DateTimeZone.FixedLocalNow()+ #duration(0,#"Time Offset in Hours",0,0)) >= 7
and
Date.Month(DateTimeZone.FixedLocalNow()+ #duration(0,#"Time Offset in Hours",0,0)) <= 12 then Date.Year(DateTimeZone.FixedLocalNow()+ #duration(0,#"Time Offset in Hours",0,0))+1 else Date.Year(DateTimeZone.FixedLocalNow()+ #duration(0,#"Time Offset in Hours",0,0))), #"Added Conditional Column3" = Table.AddColumn(#"Added Current Fiscal Year", "Is Current Fiscal Year", each if [Fiscal Year] = [Current Fiscal Year] then "Current Fiscal Year" else "Other Fiscal Year" ), #"Removed Columns3" = Table.RemoveColumns(#"Added Conditional Column3",{"Current Fiscal Year"}), #"Renamed Columns2" = Table.RenameColumns(#"Removed Columns3",{{"Calendar Date", "Date"}, {"Calendar Month Name", "Calendar Month"}}), #"Removed Columns4" = Table.RemoveColumns(#"Renamed Columns2",{"Index"}), #"Changed Type2" = Table.TransformColumnTypes(#"Removed Columns4",{{"Date", type date}}), #"Added Current Date" = Table.AddColumn(#"Changed Type2", "Current Date", each Date.From(DateTimeZone.FixedLocalNow()+ #duration(0,#"Time Offset in Hours",0,0))), #"Changed Type3" = Table.TransformColumnTypes(#"Added Current Date",{{"Current Date", type date}}), #"Added Conditional Column4" = Table.AddColumn(#"Changed Type3", "IsCurrentDay", each if [Date] = [Current Date] then "Current Date" else "Other Date" ), #"Changed Type4" = Table.TransformColumnTypes(#"Added Conditional Column4",{{"IsCurrentDay", type text}}), #"Added Custom8" = Table.AddColumn(#"Changed Type4", "YesterDay", each Date.AddDays(Date.From(DateTimeZone.FixedLocalNow()+ #duration(0,#"Time Offset in Hours",0,0)),-1)), #"Added Conditional Column5" = Table.AddColumn(#"Added Custom8", "Today/Yesterday - Other Days", each if [Date] = [YesterDay] then "Yesterday" else if [Date] = [Current Date] then "Today" else "Other Day" ), #"Removed Columns6" = Table.RemoveColumns(#"Added Conditional Column5",{"YesterDay"}), #"Removed Columns5" = Table.RemoveColumns(#"Removed Columns6",{"Current Date"}), #"Changed Type5" = Table.TransformColumnTypes(#"Removed Columns5",{{"Today/Yesterday - Other Days", type text}}), #"Added Conditional Column6" = Table.AddColumn(#"Changed Type5", "T/Y/O Days Sort Order", each if [#"Today/Yesterday - Other Days"] = "Today" then "1" else if [#"Today/Yesterday - Other Days"] = "Yesterday" then "2" else "3" ), #"Changed Type6" = Table.TransformColumnTypes(#"Added Conditional Column6",{{"T/Y/O Days Sort Order", Int64.Type}}), #"A-FirstDayOfMonth" = Table.AddColumn(#"Changed Type6", "First Day of Month", each Date.StartOfMonth([Date])), #"Added Custom7" = Table.AddColumn(#"A-FirstDayOfMonth", "Is CY or LY", each if Date.Year([Date]) = Date.Year(Date.From(DateTimeZone.FixedLocalNow()+ #duration(0,#"Time Offset in Hours",0,0))) then "CY" else "LY"), #"Added Custom6" = Table.AddColumn(#"Added Custom7", "CY or LY", each if Date.Year([Date]) = Date.Year(Date.From(DateTimeZone.FixedLocalNow()+ #duration(0,#"Time Offset in Hours",0,0))) then "CY " & Text.From(Date.StartOfMonth([Date])) else "LY " & Text.From(Date.StartOfMonth([Date]))), #"Add - Past 3 Mths" = Table.AddColumn(#"Added Custom6", "Past 3 Months Date", each Date.AddMonths(Date.From(DateTimeZone.FixedLocalNow()+ #duration(0,#"Time Offset in Hours",0,0)),-2)), #"Add - Curr Date" = Table.AddColumn(#"Add - Past 3 Mths", "Current Date", each Date.From(DateTimeZone.SwitchZone(DateTimeZone.FixedLocalNow(),10))), #"Added Custom9" = Table.AddColumn(#"Add - Curr Date", "Current 3 Months", each if [Date] >= [Past 3 Months Date] and [Date] <= [Current Date] then "Current 3 Months" else "Other Months"), #"Added End Date of Week" = Table.AddColumn(#"Added Custom9", "Rolling Week End Date", each Date.EndOfWeek([Date], Day.Monday)), #"Added DateKey" = Table.AddColumn(#"Added End Date of Week", "DateKey", each Number.From(Text.End(Text.From([Date]),4) & Text.Range(Text.End(Text.From([Date]),7),0,2) & Text.PadStart(Text.Replace(Text.Range(Text.End(Text.From([Date]),10),0,2),"/",""),2,"0"))), #"Add-YearWeekNumber" = Table.AddColumn(#"Added DateKey", "Year-WeekNumber", each Number.ToText([Calendar Year]) & "-" & Number.ToText([Week Number of Year])), #"Add-YEarWeekNumberSortBy" = Table.AddColumn(#"Add-YearWeekNumber", "Year-WeekNumber Sort By", each Number.From(Text.From([Calendar Year]) & Text.PadStart(Text.From([Week Number of Year]),2,"0"))), #"Changed Type7" = Table.TransformColumnTypes(#"Add-YEarWeekNumberSortBy",{{"Year-WeekNumber Sort By", Int64.Type}}), #"Added Custom10" = Table.AddColumn(#"Changed Type7", "Day of Week", each if Date.DayOfWeek([Date]) >=0 and Date.DayOfWeek([Date]) <= 4 then "Is Work Day" else "Weekend"), #"Changed Type8" = Table.TransformColumnTypes(#"Added Custom10",{{"Day of Week", type text}}), #"Added Custom11" = Table.AddColumn(#"Changed Type8", "FY Month Year", each [Fiscal Month] & "-" & Text.From([Fiscal Year])), #"Changed Type9" = Table.TransformColumnTypes(#"Added Custom11",{{"FY Month Year", type text}}), #"Added Custom12" = Table.AddColumn(#"Changed Type9", "FY Month Year Sort By", each Number.From(Text.From([Fiscal Year]) & Text.PadStart(Text.From([Fiscal Month Sort Order]),2,"0"))), #"Changed Type10" = Table.TransformColumnTypes(#"Added Custom12",{{"FY Month Year Sort By", Int64.Type}}), #"Added Custom13" = Table.AddColumn(#"Changed Type10", "Month Year Sort By", each Number.From(Text.From([Calendar Year]) & Text.PadStart(Text.From([Calendar Month Number]),2,"0"))), #"Added Custom14" = Table.AddColumn(#"Added Custom13", "Month Year", each [Calendar Month] & "-" & Text.From([Calendar Year])), #"Changed Type11" = Table.TransformColumnTypes(#"Added Custom14",{{"Month Year Sort By", Int64.Type}}) in #"Changed Type11"
Hello Gilbert,
I have tried to code that you provided it is not working.
let
// Oct 2017: This is so that I can work out if Daylight Savings Should be applied and Offset by How Many Hours
// Need to get the Current Date Time into Variable, then use this below with Parameter values to get the output to be used
// later for other Offset Timings that use the #duration syntax
#”Current Date” = Date.From(DateTimeZone.FixedLocalNow()+ #duration(0,#”UTC Offset”,0,0)),
#”Time Offset in Hours” = if #”Current Date” >= #”Daylight Savings Start Date” and #”Current Date” < = #"Daylight Savings End Date" then (#"UTC Offset") – (#"Daylight Savings Hour Offset") else #"UTC Offset",
// 20-Sep 2017: This is to get the Week of the Year, based on the Fiscal Start Month, which is used later in this query.
// #"Fiscal Start Week" = Date.WeekOfYear(Date.From("01/" & Text.From(#"Fiscal Start Month") & "/" & Text.From(#"End Year"))), Date = let Source = List.Dates, FiscalMonthCalc = 12-#"Fiscal Start Month",
// 1. Uncomment this line if you want to get your end date being Today's Date of the Refresh
//#"Invoked FunctionSource" = Source(#date(#"Start Year", 1, 1), Duration.Days(DateTime.Date(DateTime.FixedLocalNow()) – #date(#"Start Year",1,1)), #duration(1, 0, 0, 0)),
// 2. Uncomment this line below if you want your end date to be 4 years into the future
#"Invoked FunctionSource" = Source(#date(#"Start Year", 2, 2018), Duration.Days(DateTime.Date(Date.AddDays(Date.EndOfYear(Date.AddYears(DateTime.FixedLocalNow(),+4)),-1)) – #date(#"Start Year",1,1)), #duration(1, 0, 0, 0)),
// 3. Uncomment this line if you want to get your end date being the Parameter called "End Year"
//#"Invoked FunctionSource" = Source(#date(#"Start Year", 1, 1), Duration.Days(#date(#"End Year", 12, 30) – #date(#"Start Year",1,1)), #duration(1, 0, 0, 0)),
#"Table from List" = Table.FromList(#"Invoked FunctionSource", Splitter.SplitByNothing(), null, null, ExtraValues.Error),
#"Added Index" = Table.AddIndexColumn(#"Table from List", "Index", 1, 1), #"Renamed Columns" = Table.RenameColumns(#"Added Index",{{"Column1", "Date"}}),
#"Added Custom" = Table.AddColumn(#"Renamed Columns", "Year", each Date.Year([Date])),
#"Added Custom1" = Table.AddColumn(#"Added Custom", "Month Number", each Date.Month([Date])),
#"Added Custom2" = Table.AddColumn(#"Added Custom1", "Day", each Date.Day([Date])),
#"Added Custom3" = Table.AddColumn(#"Added Custom2", "Day Name", each Date.ToText([Date],"ddd")),
#"Added Custom4" = Table.AddColumn(#"Added Custom3", "Month Name", each Date.ToText([Date],"MMM")),
#"Reordered Columns" = Table.ReorderColumns(#"Added Custom4",{"Date", "Index", "Year", "Month Number", "Month Name", "Day", "Day Name"}),
#"Added Custom5" = Table.AddColumn(#"Reordered Columns", "Quarter Number", each Date.QuarterOfYear([Date])),
#"Duplicated Column" = Table.DuplicateColumn(#"Added Custom5", "Year", "Copy of Year"),
#"Renamed Columns1" = Table.RenameColumns(#"Duplicated Column",{{"Copy of Year", "Short Year"}}),
#"Changed Type" = Table.TransformColumnTypes(#"Renamed Columns1",{{"Short Year", type text}}),
#"Split Column by Position" = Table.SplitColumn(#"Changed Type","Short Year",Splitter.SplitTextByRepeatedLengths(2),{"Short Year.1", "Short Year.2"}),
#"Changed Type1" = Table.TransformColumnTypes(#"Split Column by Position",{{"Short Year.1", Int64.Type}, {"Short Year.2", Int64.Type}}),
#"Removed Columns" = Table.RemoveColumns(#"Changed Type1",{"Short Year.1"}), #"Renamed Columns2" = Table.RenameColumns(#"Removed Columns",{{"Short Year.2", "Short Year"}}),
#"Added Custom6" = Table.AddColumn(#"Renamed Columns2", "Quarter Year", each Number.ToText([Short Year]) & "Q" & Number.ToText([Quarter Number],"00")),
#"Reordered Columns1" = Table.ReorderColumns(#"Added Custom6",{"Index", "Date", "Day", "Day Name", "Month Number", "Month Name", "Quarter Number", "Quarter Year", "Short Year", "Year"}),
#"Changed Type2" = Table.TransformColumnTypes(#"Reordered Columns1",{{"Date", type date}, {"Day", Int64.Type}, {"Index", Int64.Type}, {"Month Number", Int64.Type}, {"Quarter Number", Int64.Type}, {"Month Name", type text}, {"Quarter Year", type text}, {"Year", Int64.Type}}),
#"Added Conditional Column" = Table.AddColumn(#"Changed Type2", "Fiscal Year", each if [Month Number] < #"Fiscal Start Month" then [Year] else [Year]+1 ),
#"Added Conditional Column1" = Table.AddColumn(#"Added Conditional Column", "Fiscal Month", each if [Month Number] = 1 and [Fiscal Month Sort Order] = 4 and [Fiscal Month Sort Order] = 7 and [Fiscal Month Sort Order] = 10 and [Fiscal Month Sort Order] = 1 and [Fiscal Month Sort Order] = 4 and [Fiscal Month Sort Order] = 7 and [Fiscal Month Sort Order] = 10 and [Fiscal Month Sort Order] <= 12 then "4"
else "Q Unknown" ),
#"Changed Type3" = Table.TransformColumnTypes(#"Added Conditional Column4",{{"Fiscal Quarter Sort Number", Int64.Type}, {"Fiscal Month Sort Order", Int64.Type}, {"Fiscal Year", Int64.Type}}),
#"Renamed Columns3" = Table.RenameColumns(#"Changed Type3",{{"Date", "Calendar Date"}, {"Month Number", "Calendar Month Number"}, {"Month Name", "Calendar Month Name"}, {"Quarter Number", "Calendar Quarter Number"}, {"Quarter Year", "Calendar Quarter Year"}, {"Short Year", "Calendar Short Year"}, {"Year", "Calendar Year"}}) in #"Renamed Columns3",
#"Duplicated Column" = Table.DuplicateColumn(Date, "Calendar Date", "Calendar Date – Copy"),
#"Calculated Week of Year" = Table.TransformColumns(#"Duplicated Column",{{"Calendar Date – Copy", Date.WeekOfYear}}),
#"Renamed Columns" = Table.RenameColumns(#"Calculated Week of Year",{{"Calendar Date – Copy", "Week Number of Year"}}),
#"Duplicated Column1" = Table.DuplicateColumn(#"Renamed Columns", "Calendar Date", "Calendar Date – Copy"),
#"Calculated Week of Month" = Table.TransformColumns(#"Duplicated Column1",{{"Calendar Date – Copy", Date.WeekOfMonth}}),
#"Renamed Columns1" = Table.RenameColumns(#"Calculated Week of Month",{{"Calendar Date – Copy", "Week Number of Month"}, {"Calendar Year", "Calendar Year"}}),
#"Added Custom" = Table.AddColumn(#"Renamed Columns1", "Start Date of Week", each Date.StartOfWeek([Calendar Date], Day.Monday)),
#"Added Custom1" = Table.AddColumn(#"Added Custom", "End Date of Week", each Date.EndOfWeek([Calendar Date], Day.Monday)),
#"Added Custom2" = Table.AddColumn(#"Added Custom1", "Week Start & End Date", each Date.ToText(Date.StartOfWeek([Calendar Date], Day.Monday),"MM/dd") & "-" & Date.ToText(Date.EndOfWeek([Calendar Date], Day.Monday),"MM/dd")),
// 20-Sep-2017: This is the step where I am calculating the Week of Fiscal Year based on the Fiscal Start Week I defined earlier. It also uses the Fiscal Start Month logic to ensure that is dynamic based on the parameter
#"Added Fiscal Week – Original" = Table.AddColumn(#"Added Custom2", "Week of Fiscal Year", each if [Calendar Month Number] < #"Fiscal Start Month" then #"Fiscal Start Week" + [Week Number of Year]-2 else (#"Fiscal Start Week" -[Week Number of Year])*(-1)+1),
#"Add – Fiscal Week" = Table.AddColumn(#"Added Fiscal Week – Original", "New Fiscal Week", each if [Calendar Month Number] = [Start of Rolling Week Date] and [Calendar Date] = 7
and
Date.Month(DateTimeZone.FixedLocalNow()+ #duration(0,#”Time Offset in Hours”,0,0)) = [Past 3 Months Date] and [Date] =0 and Date.DayOfWeek([Date]) < = 4 then "Is Work Day" else "Weekend"),
#"Changed Type8" = Table.TransformColumnTypes(#"Added Custom10",{{"Day of Week", type text}}),
#"Added Custom11" = Table.AddColumn(#"Changed Type8", "FY Month Year", each [Fiscal Month] & "-" & Text.From([Fiscal Year])), #"Changed Type9" = Table.TransformColumnTypes(#"Added Custom11",{{"FY Month Year", type text}}),
#"Added Custom12" = Table.AddColumn(#"Changed Type9", "FY Month Year Sort By", each Number.From(Text.From([Fiscal Year]) & Text.PadStart(Text.From([Fiscal Month Sort Order]),2,"0"))),
#"Changed Type10" = Table.TransformColumnTypes(#"Added Custom12",{{"FY Month Year Sort By", Int64.Type}}),
#"Added Custom13" = Table.AddColumn(#"Changed Type10", "Month Year Sort By", each Number.From(Text.From([Calendar Year]) & Text.PadStart(Text.From([Calendar Month Number]),2,"0"))),
#"Added Custom14" = Table.AddColumn(#"Added Custom13", "Month Year", each [Calendar Month] & "-" & Text.From([Calendar Year])),
#"Changed Type11" = Table.TransformColumnTypes(#"Added Custom14",{{"Month Year Sort By", Int64.Type}}) in #"Changed Type11"